Thursday
Jun032010

Sick of stained carpets? Not any more!

There are many carpet cleanign products available at Click CleaningIf there’s something that everyone hates, it’s a stain on a carpet – particularly if you’ve just had them fitted. Even if you haven’t, stains are incredibly unsightly and can really make your carpet look like they’ve seen better days. And sometimes no end of scrubbing will get the stain out, and even if it does it can leave your carpet looking forlorn and rough. Scrubbing is hardly ever the best solution – in fact if you need to scrub then you probably aren’t using the right products. So why not find out the best way to remove stains so your carpet is quickly returned to its original condition?

Here are the steps you need to take to banish stains in a flash;

STEP 1: Remove solid matter

Always remove as much solid matter as possible using a spatula or blunt knife edge. Do not use anything sharp as this can cut into your carpet and damage the fibres. Do this as soon as you can; the longer a stain is left to dry the harder it is to remove.

STEP 2: Blot the stain

This is important if the stain is fresh. Remove as much of the liquid as possible with white paper towels or tissues, but never use coloured products as the colour can transfer and add to the problem. Apply the tissue with firm, even pressure and gently press down. Repeat several times until you cannot lift any more liquid.

STEP 4: Pre-test products

With any chemical product you should always pre-test it in an inconspicuous area, such as under a sofa or behind a piece of furniture. If you’ve got any carpet left over in your loft or shed you could use this – if it reacts badly you won’t have damaged anything valuable.

STEP 5: Remove the stain

The type of stain will dictate the products you need to use, and the order in which you use them. Read out stain removal guide for full details on every type of stain you can imagine!

Apply a small amount of your spotting agent to the carpet fibres and blot gently with a clean, new white towel. If colour transfers to the towel or a colour change occurs, do not continue and consult a professional. Otherwise do not rub or brush, but continue blotting the stain. Do not over-wet the stain, but use small amounts of the spotting product – you can always apply more. Keep applying and blotting until the stain is gone. Apply your next product and repeat the process.

STEP 7: Rinse the area

Use a fabric rinse or water to rinse the area and remove all traces of the spotting agents. Again, do not over wet the area – apply a small amount the blot repeatedly.

STEP 8: Reset the fibres

All that work will probably have moved the fibres about – it’s important to brush them back into place so the area doesn’t look out of sync with the rest of your carpet. Work from the outer edge to the centre to prevent ring marks forming, and use a soft brush to prevent damage.

Friday
May212010

Prochem Cleaning Products

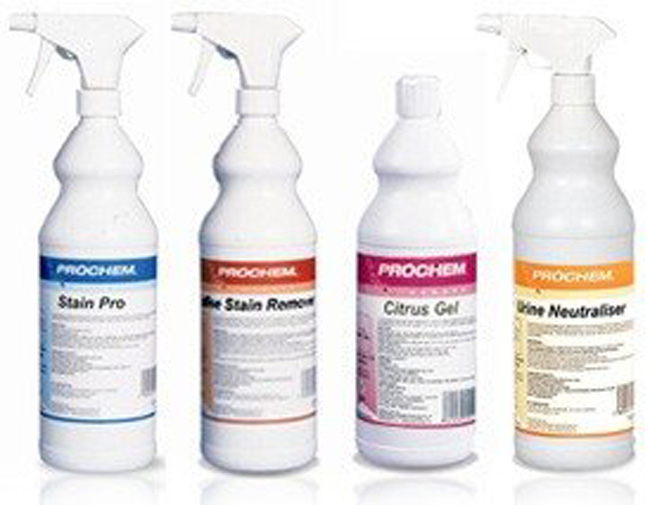
One of Prochems Clenaing Kits availableCleaning can either be easy and simple or hard work and time consuming. Whatever the job may entail, you can be sure that the stain or mess will be cleaned up in no time, with the help of our Prochem products.

Prochem provide some of the industry’s leading cleaning products and has been producing these products for over 40 years. When you buy a Prochem product you know it is a quality purchase and more than 80 of their products can be found on our site. These products consist of carpet cleaners, cleaning kits, odour control, upholstery products, cleaning accessories, defoamers, presprays, stain removal products and specialist cleaners.

For carpet cleaning, the Crystal Green, the Prochem Fibrebuff & the Prochem Fibresafe offer some of the best carpet cleaning solutions available, allowing you to revive your carpets back to state that they were when new.

With Prochem upholstery products, tending to your furniture, curtains and drapery can never be made easier, there are special products that are highly adaptable to cleaning leather as well to help you maintain welcoming home.

To look at the full range of Prochem products that we have available browse through our website. There are also great bulk buy offers and free UK delivery (minimum order quantity applies).

Sunday
May092010

How to Clean a Car

Make your car look brand new againCleaning a car is easy, but cleaning a car well is very difficult. The obvious way to do it is often the worst way and it takes a very carefully disciplined process to ensure. In addition, getting your car sparkling is a laborious process that cannot be completed in a spare half hour – expect to spend at least 2-3 hours, and perhaps more, to give the vehicle a full clean.

STEP 1: Rinse the vehicle

Rinse and wet your vehicle with normal tap water, but do not use a sponge. It will pick up grit and function like sandpaper on the surface. A high pressure hose is ideal but a good quality hose with a strong flow will also work. Make sure you get all surfaces wet several times – the water will wash off the loose dirt and will gradually help dissolve the heavier dirt.

You’ll need the leave the water for the time being to work into the dirt.

STEP 2: Clean the inside

Pick up sweet wrappers, crisp packets, tissues and any other rubbish. Take out foot mats and vacuum them away from the vehicle. Shake them out and leave them hanging outside to freshen them up. Hoover the rest of the interior including upholstery (you may need to use a special pet hair attachment if you own a dog). Wipe down the dashboard and other plastic areas with a damp cloth, and use a mild detergent to remove dirt. Do not use chemical cleaners as these can ruin the finish. Carpets and upholstery can be cleaned using a specialist fabric shampoo or a steam cleaner. Finally, hoover out the boot and wipe down surfaces.

Be VERY careful when cleaning the pedals. Silicone and oil based cleaners can leave a slippery residue which could have disastrous consequences when driving. Use only water.

STEP 3: Pre-wash the exterior

Hose the outside again to remoisten and use a soft cloth to gently rub down the entire exterior. Start at the top and work downwards, doing the bumpers and number plates last – the aim is to remove all dirt and grime. Make a solution in a bucket of fresh water and a well-known car prewash product. Apply sparingly, rub in gently then wash off with fresh water.

STEP 4: Wash the exterior


Use a reputable car shampoo and mix a solution with water, or follow the manufacturer’s instructions. The previous prewashing and rubbing should have effectively removed all dirt so this is the time to really get your car sparkling. A harder sponge can be used on hidden areas such as sills, which tend to get very dirty.

STEP 5: Tyres and wheels

These will most likely be filthy and require special treatment along with a lot of elbow grease. Clean as much as you can with a brush first, then progress to a scrubbing pad although watch out as you don’t watch to scratch the rims. Excess brake dust and ground in dirt may require a chemical cleaner to remove – check in at your local car superstore to see what products they have.

After cleaning the tyres and wheels, rinse them off thoroughly with water.

STEP 6: Dry the car

Use a chamois leather to dry the car using very gentle circular movements. This takes quite a while so be prepared to be patient. It’s best if you wash your car on a day when there’s not much sun as this will give you plenty of time to dry the car with the leather before sun dries it.

STEP 7: Clean the glass

Go over the windows – inside and out – with a dedicated car glass cleaning product. Again, use gentle circular movements and don’t rush, or streaks will appear. Microfibre cloths are best for this as they won’t leave a residue or allow the windows to streak.

STEP 8: Polish the car

Polish is frequently applied in the wrong way and can very quickly ruin a hard day’s work if you do this. Polish is designed to be rubbed on, not in. Rub it on in lines so that it forms a light shimmer then buff it using a microfibre cloth. After this use a clean soft cloth to buff it even further.

STEP 9: Show off your car

Get in and drive it around, showing off the exterior for all to see!

If you’re looking for a range of specially formulated car cleaning supplies to help you return your car to showroom brilliance, check out Click Cleaning’s car cleaning products today or call 0845 680 1955 for a free consultation.

Monday
May032010

Spring Cleaning your Kitchen

Revive your kitchen back to newThis could be the job you have been treading, as it seems to be the biggest spring clean to do, but with this step by step guide, spring cleaning your kitchen could be made a breeze.

•    Start with an initial cleanup, removing dirty dishes and clutter to make room for your spring clean.

•    Dust the ceiling, corners of walls, artwork on the wall and the ceiling fan if you have one.

•    Wash all curtains and draperies and wash the inside and outside of the windowsill(s) as well as the window itself.

•    Save time and do two jobs at the same time. Leave the oven cleaner to do its job as you clean the inside and outside surfaces of the fridge, but before you start cleaning the fridge make sure it is unplugged. This is also a great time to sweep and mop underneath the appliances. After cleaning the fridge, follow the instructions on the oven cleaner to finish off the inside of the oven.

•    Complete the oven clean by removing and washing the knobs, burners, burn covers and spill catchers and wipe down the stove area.

•    Wipe down and clean all small appliances, such as the microwave and toaster.

•    Now it is time to clean all kitchen cupboards and drawers, by removing all the contents and binning all the rubbish before wiping down.

•    Make your dishwasher gleam. Remove all food from the bottom; wipe down all outside surfaces before running the dishwasher with cleaning products.

•    Now comes the smaller jobs, wash down counter tops, the sink and make sure you empty and wash the bin.

•    To finish off sweep and mop, then sit back and take a look at a kitchen that looks brand new.


Tuesday
Apr272010

The benefits of the Vileda Supermop

Vileda Supermop: professional cleaning results at a great priceThe Vileda Supermop, is super by name and performance. No wonder Vieda has become a household name.

It is easy to use; to wring out the flat sponge you simply slide the handle up so the sponge can squeeze any unwanted residue. The non-woven strands are highly absorbent, leaving floors dryer than usual domestic mops.

What’s more it is more hygienic than any other mop as the non-woven strands are sealed with a protector that stops the gems and bacteria from increasing.  As the strands are non-woven there isn’t any mess, it won’t unravel and won’t shred. The Supermop is long lasting and resilient, the handle won’t rust or chip and is comfortable to use.

If you're looking for a superior product to cope with a range of commercial and household situations the Vileda Supermop is available at a great price. It's been specificallly designed to cope with heavy spills so you don't have to worry about losing absorbing power half way through a job. As a no-nonsense, versatile mop it's a market-leader.

Ideal for:

  • Spot mopping
  • Small area cleaning
  • Bars
  • Washrooms
  • Bathrooms
  • Kitchen